


Sweets for the Sweet ~ Candied Orange Peel
I missed a couple of challenges while I was off traveling the world, so now I’m playing catch-up. London was amazing, as I always knew it would be. It is now my #1 favorite city. And by that I mean it is in a league all its own, there is nowhere comparable.
The main reason I went on this adventure was for research. There was so much I wanted to do: various museums and special exhibits, walks to go on, parks to explore, and homes decorated in the period style I needed to see.

One of these must see places was the Dennis Severs’ House at 18 Folgate St, Spitalfields, London. What made this one of my must-sees was its accurate representation of the interior of a period specific house. Beginning in the 1600s, each floor was a different generation, the higher you go, the more current the time period. When I walked up the stairs into the late 18th century, I was struck by the opulence of the rooms and decor. It was as if I stepped into a party and everyone had walked into another room. Voices and chatter were heard, but no distinct conversations. It was a bit eerie, to say the least.
Set out on a small table were little plates and tongs for the serving of sweets and treats. A three tiered dish full of Jordan almonds, candied orange peels and flowers, dried fruits and nuts. The candied orange peels caught my attention because I have made them before and found them very easy to do. And what is better for a challenge on sweets than a simple candied fruit?
The Challenge: Sweets for the Sweet (February 12 – February 25)
It’s sugar, and maybe spice, and definitely everything nice. Test out a historic recipe for sweets, sweetmeats and candies – but don’t let them spoil your appetite!
The Recipe:
I’ve been making candied peels for several years and can’t even remember where I learned to make them. The recipe for candied anything is pretty simple and straightforward: simmer the fruit – or peel in this case – in equal parts sugar and water until tender and sweetened throughout. The hard part was finding a historic recipe that fit the bill. But I did manage to find one in the The New London Family Cook: Or, Town and Country Housekeeper’s Guide by Duncan Macdonald.

The Date/Year and Region:
Candied fruit dates back to ancient times. Originally a form of preservation, the ancient Romans used honey to ensure their fruits could be eaten all year round. By the middle ages, honey was replaced by sugar and candied fruits were a sign of affluence, served by the wealthy to only the most notable of guests. Displaying such fare at a home gathering in the late 18th century was a sure way to subtly remind guests of the host’s status. The recipe above dates from 1808 London.
[slideshow_deploy id=’2918′]
How Did You Make It:
My family purged our supply of oranges from the tree to make orange juice while I was in London, so I was forced to use store bought fruit. I opted to use Cara Cara oranges – a variety of naval orange – because of their thick skin and sweeter fruit. Fruit never lasts long in our house, and all eight of the oranges I peeled for this, were gone by the next day.
- Since I was using the skin of store bought fruit, I gave them a long soak in hot water and a good scrub with the brush to remove the waxy coating. Even if using organic or homegrown, a good bath will get rid of any bugs, dirt, or dust that may settle on the skin.
- With a butcher knife, I cut off the ends of the fruit, and scored the skin into four sections before removing the peel and pith by hand. Setting aside the fruit, I cut the peels into 1/4 inch strips and put them into a bowl.
- In a medium stock pot, I added equal parts water and cane sugar, heating it until the sugar dissolved and I became hypnotized by the swirling of the sugar bubbles.
- Adding the sliced peels into the water, I brought them up to a
 gentle simmer and let them cook for several hours. Since the peels had a bit of pith on them, they tended to float, which would not let them cook properly. A little ingenuity with a plate and bowl solved that problem, keeping the peels submerged until they were cooked down enough not to float above the surface.
 - Once done, I used a spider to remove the peels from the sugar syrup in small batches, and tossed them with a fork in more of the cane sugar. The sugar will clump together because of the residual liquid, so I made sure to whisk the sugar with the fork between batches of peels to break up the chunks.
- Removing the peels from the sugar, I laid them out on a baking sheet lined with parchment paper to prevent them from sticking. They looked like little soldiers all lined up in neat rows.
- At this point, the sugared peels needed to dry for at least two days, preferably more, before being eaten or used in other recipes. The longer they dry the crunchier the sugar coating becomes.
Gee…when I list it out like this it seems so time-consuming! It really isn’t as difficult as it sounds here. Some options for the peels are eating them as candy, dipping half of each peel in tempered dark chocolate and letting it set, chopping into smaller pieces and using in cakes or as a topping for desserts. You can even mix it up and candy lemon, citron or lime peels though with the lime, be sure to eliminate as much of the pith before cooking, or else it turns bitter
Time to Complete:
Total time three days, four and a half hours.
The actual cooking time will vary depending on the thickness and amount of the peels. I used eight oranges because candied peels never last long in the house, and that turned into about three hours simmer time. You can tell the peels are done when they are semi-translucent, soft to bite into, and there is little to no bitterness when tasted. For this batch, from start to laying out to dry, took about four and a half hours, the majority of the time was the peels simmering unattended on the stove.
I left the sugared peels to sit for three days to dry completely.

Total Cost:
Since I already had the sugar and water at home, the only cost was the oranges. I used Cara Cara oranges, and they happened to be on sale that week for $ 0.98 a pound. All eight oranges totaled about 7.5 lbs, or $7.35.
How Successful Was It?:
I’ve made these before, so I knew they would be a hit. This was the first time I’d given them out to friends, and they loved them, so I’ll take that as a success.
They are sweet and crunchy with just a touch of bitter on the thicker pieces. While it sounds bad, the contrast in flavors works.
One reason I used the Cara Cara oranges is because of the bright color of their skins. Combined with the crystalline sugar, they fairly sparkled in their bright orange glory
How Accurate Is It?:
I stuck pretty close to the traditional method: peel, boil, sugar, dry.
The biggest change I made was with the variety of orange I used. In Georgian England, Seville oranges were the citrus of choice. They were so common that many of the “fashionable elite” built special orangeries to protect the trees in the winter, and to make sure the trees produced fruit even in the cold months. Built as separate structures, orangeries were also a way to show off the wealth of the homeowner.
While Seville oranges are the traditional orange to use, they tend to be both bitter and sour and, therefore, difficult to find in local grocery stores. Cara Cara oranges tend to be sweet in taste and are thus readily available – and on sale.
One thing I did stick with was the use of cane sugar. It has a courser grind than beet sugar and is less likely to dissolve when it comes in contact with the wet orange peels.
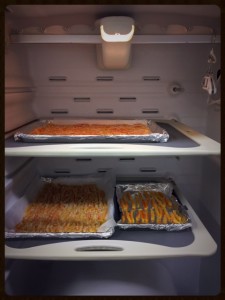
Okay, I did another modification…kind of. The original recipe calls for air drying the sugared peels for several days. The current trend is to speed up the process and “cook” them in the oven at low heat. Indeed, many online recipes use this method. But I chose to air-dry my peels. The only problem was that I had two full-size and one half-size baking sheet full of peels and no place to put them for such a long time. So, like I did with the plate and the bowl, I improvised. I shut them in the double-decker clothes dryer until they were ready.
Overall these are a success I make them once or twice a year and they never last long if you have the time and oranges, I recommend you try your hand at them.
Cheers!
2 comments